Mason Bee Nesting Systems

Cardboard or Paper Tubes – Prefabricated cardboard tubes are readily available and Mason Bees will happily nest in them. Try to use 6″ long tubes as the shorter lengths will only result in fewer females being laid, and it is the females that do all the pollinating. You can also roll your own tubes out of ordinary brown  kraft paper worked around a wooden dowel. These will need to have an inner diameter of 1/4″ to 3/8″ and be stopped at one end. Either can be slipped into drilled wooden blocks or bundled and housed in any waterproof structure (if the paper or cardboard gets wet, mold will become an issue) that the bees can access. The sides of the tubes should not be readily accessible, as parasitic wasps may get through. Both cardboard and paper tubes are disposable and will need to be carefully cut open to harvest the cocoons for cleaning.

Table Saw-Cut or Routered Wooden Trays – Stackable wooden trays can be made from finished 1 x 4-6″ dimension lumber (not cedar or treated wood) cut to 6.5-7″ lengths and channeled using a 5/16″ router bit or a table saw fitted with a dado blade – both should be cut to a 6″ depth with only one open side. Saw-cut trays are more square-edged and it does take the bees more time and mud to seal them, but they still seem quite happy to use these. There needs to be a tight fit between wooden trays to prevent mites from migrating from one to another – this can be achieved by taping or using a threaded rod system to hold them securely in place. Wooden trays are easy to access for cocoon harvesting and can be cleaned, although they may absorb moisture and mold can become an issue – which is why they need to be housed in a waterproof shelter or under the protection of an eave.

Stackable Plastic Trays – The most common plastic components currently available in coastal BC are the Beediverse Quicklock Trays. Each tray has 6 rounded grooves that when locked together with another form nesting tunnels. These are composed of a corn-based plastic (more than 75%) with a rough interior finish similar to wood. The trays can be stacked to any desired height and are best secured together using electrician’s tape. They also come in multiple colours which can help the Mason Bees to find their tunnels more quickly when they return from foraging. These trays can be purchased with prefabrictaed wood shelters, some of which are fitted with plastic predator guards and emergence chambers. They are also easy to access and clean.

Drilled Wooden Blocks – Although this system was commonly used when Mason Bee production first became popular, the inability to access the cocoons or nesting hole for cleaning has lead to severe mite infestations. Both lumber (not cedar or aromatic wood) or seasoned natural wood blocks can be used, with the holes being drilled with a 1/4″ to 3/8″ bit to a depth of about 6″. You can also drill slightly larger holes to accomodate cardboard or paper tube liners to minimize the mite problem, although they will need some protection from the rain (such as the sheet metal roof shown). Drilled wooden blocks cannot be cleaned and should be considered disposable unless inserts are used.

Natural Reeds – These are the materials that Mason Bees naturally use in the wild and may include the hollow stems of bamboo, grasses, shrubs and trees. While imitating nature may seem like the best thing to do, many of these reeds have irregular sizes and they are difficult (if not impossible) to open for cleaning. These can be bundled and housed like cardboard tubes, but should be considered disposable.

Mason Bee Viewing Boxes – These come in various configurations but all have a clear plastic wall so that the entire length of the tunnels and cocoons can be seen at a casual glance. They are great educational tools for children or even people considering Mason Bee pollination for their own gardens. Most are single wooden tray configurations fitted with a hinged lid or housed in a box – all of which can be cleaned.

Posted in Gardening | Tagged | 2 Comments

Easy 4-Step Winter Planter V

This eye-catching winter planter features the vibrant purple tones of a young Beauty Berry shrub (Callicarpa ‘Profusion’) paired with a bud bloomer heather, Calluna vulgaris ‘Amethyst’. A silver variegated lavender (Lavandula x intermedia ‘Silver Edge’) and English Ivy (‘Glacier’) provide some contrast and soften the planter edge. The berries should last into January.

Hedera helix ‘Glacier’ – This RHS Award of Garden Merit winner is an evergreen vine or trailing plant (when used in a container) with grey-green foliage and irregular creamy-white marginal variegation. It is perhaps one of the most common cultivars of English Ivy and can be grown as a houseplant. Tolerates shade to full sun. Grows 4-6″ high by 2-6′ wide or tall. Hardy to zone 6.

Callicarpa bodinieri var. giraldii ‘Profusion’ – This is the only Beauty Berry cultivar to have in your garden, as ‘Profusion’ bears abundant deep violet berries that almost look artificial. This AGM winner has small pink flowers that are hidden in the foliage, but once the leaves drop in autumn, it is a real showpiece. Works well in planters. Grows 4-6′ high and wide. Hardy to zone 6.

Lavandula x intermedia ‘Silver Edge’ (syn. ‘Walvera’, ‘Walberton’s Silver Edge’) – This evergreen shrub was discovered as a sport in Sussex, England. It bears dusty purplish-blue flowers in summer that can be dried and used in sachets or potpourri. The handsome silvery-green foliage is subtly edged in creamy-white. Drought tolerant. Grows 24-30″ high by 18″ wide. Zone 5.

Calluna vulgaris ‘Amethyst’ – This Scotch heather is a bud bloomer type that is part of the Garden Girls series bred by Kurt Kramer in Germany. It produces purplish flower buds (that don’t open) which keep their colour from late August until January. These are nicely contrasted by spiky dark green foliage. Good for fall or winter containers. Grows 12-15″ high by 16-20″. Zone 5.

Posted in Gardening | Tagged | Leave a comment

Overwintering Gunnera

Gunnera manicata or Giant Rhubarb is one of largest herbaceous perennials grown in coastal BC, reaching average sizes of 8′ high by 12′ wide at maturity. It is a Brazilian native and as such is only zone 8 hardy. However, it can be  successfully grown in zones 6 to 7 with proper winter care. I have used this method of insulation for the past 12 years without incident. That said, younger plants usually don’t have enough foliage to provide proper coverage using this method and will need extra insulation of covered bedding straw or dry leaves until they get large enough.

Tools and Timing – I use an old (and slightly dull) folding pruning saw (making sure the blade is securely locked in place) as the stems are quite succulent and easy to cut through with a slight swing – a machete would be equally efficient. I don’t personally use gloves when cutting Gunnera but many gardeners may them more comfortable to work with as the stems are quite spiny. You want to wait until the frosts begin to appear and minor damage occurs on the foliage (usually mid to late October here in coastal BC). Insulating too early or during warmer temperatures will only cause the crown to sweat and the insulating leaves to rot early due to composting. This can lead to premature exposure to freezing weather and permanent damage or outright plant loss.

Step 1 – Cut all the leaves off at the top of the stem and set them aside in a pile.

Step 2 – Cut the remainder of the stems down to 6-8″ long stubs and stack them  for later use. You can also cut the flower / seed stalks and lay them around the crown for extra insulation.

Step 3 – Cover the entire fleshy crown with a layer of leaves , pushing them down onto the protruding stem stubs to hold them in place.

Step 4 – Use the remainder of the leaves and lay them evenly over the entire crown in multiple layers – these should protrude about 18″ from the crown on all sides.

Step 5 – Take the cut stalks and stack these on top of the leaves to hold them in place. They can also be leaned onto the sides to keep strong autumn winds from blowing the leaves away before they have settled into place.

Posted in Gardening | Tagged | 3 Comments

Easy 4-Step Winter Planter IV

This cheerful winter planter has a backdrop of Chamaecyparis ‘Treasure Island’ with its feathery foliage highlighted by creamy-yellow accents. A sumptuous Lingonberry spills its edible (taste like cranberry) red berries over the planter’s edge, with Salvia ‘Tricolor’ (an edible sage for turkey stuffing) and Skimmia ‘Magic Marlot’ punctuating one side with their variegated foliage.

Chamaecyparis lawsoniana ‘Treasure Island’ – An extremely dwarf Lawson Cypress with feathery bluish-green foliage and creamy-yellow highlights throughout the year. It tends to do best in full morning sun but should get some shade in the afternoon to avoid scorching. It was discovered in Holland and makes an excellent container specimen. Grows 18″ high by 12-15″. Z5.

Salvia officinalis ‘Tricolor’ – This edible sage makes a fine container specimen and features grey-green leaves infused with pink or purple, and edged in creamy-white. Pick mature leaves (not woody or old ones) for drying or use fresh for lamb and egg salad sandwiches. Well-drained soils are necessary for overwintering. Grows 18-24″ high and wide. Hardy to zone 6.

Vaccinium vitis-idaea – Lingonberry is a hardy evergreen sub-shrub native to much of the northern hemisphere. It features glossy rounded deep green foliage that forms dense colonies. The white to pale pink heather-like flowers are borne in summer and are followed by bright red edible berries with a distinct cranberry flavour. Grows 6-12″ high by 18-24″ wide. Hardy to zone 2.

Skimmia japonica ‘Magic Marlot’ – This shade-loving sport of Skimmia japonica ‘Marlot’ is a male cultivar with attractive silvery-white marginal variegation. The flowers buds are held through winter and shift from greenish-white to deep red as the weather cools. These open to fragrant white flower clusters in early spring. Grows 18-24″ high by 2-3′ wide. Zone 6.

Posted in Gardening | Tagged | Leave a comment

Easy 4-Step Winter Planter III

The silver and white theme of this winter planter will brighten up any front porch. It is anchored by the variegated greyish-blue foliage of Euphorbia characias ‘Glacier Blue’. Old-fashioned Dusty Miller (Jacobaea) and the slightly trailing foliage ofCalocephalus brownii add elegance with their silvery stems – while the white-flowered winter pansies bring a little flower colour.

Euphorbia characias ‘Glacier Blue’ – A beautifully variegated form with evergreen foliage of greyish-blue, edged in cream – a great companion for Blue Fescue or Blue Oat Grass (Helictotrichon). The spring display of cream flowers  with variegated bracts is equally attractive and this cultivar is much hardier than ‘Tasmanian Tiger’. Grows 18″ high. Hardy to zone 7.

Jacobaea maritima (syn. Senecio cineraria) – Dusty Miller is an old-fashioned bedding plant, long known for its versatility and tolerance of neglect. The intensely silver foliage is a great backdrop for violas and pansies, or as an accent in winter planters. Prune out damaged foliage in spring and pinch out the flowers to prolong its lifespan. Grows 12-18″ high. Bedding Plant.

Viola x wittrockiana – These are the bread and butter of cool season bedding and come in a wide range of colours. Winter Pansies are also available with trailing habits (Plentifall Series) for hanging baskets or in ornate forms such as the darkly veined Whiskers Series. These are generally planted in the fall before the risk of frost to avoid heaving. Grows 4-8″ high. Bedding Plant.

Calocephalus brownii (renamed Leucophyta brownii) – This Australian native is usually sold as a cool season accent plant for fall planters here. The stiff wiry stems are intensely silver and also slightly trailing in habit. Silver Bush is only marginally hardy here but will survive the odd mild winter. Grows 6-10″ high (but much larger where it is hardy). Hardy to zone 9.

Posted in Gardening | Tagged | Leave a comment

Easy 4-Step Winter Planter II

This winter planter pits bright gold foliar colour against some of the best purples that cool season bedding plants can provide. The anchor shrub is the golden Cupressus ‘Wilma Goldcrest’ with Lysimachia ‘Goldilocks’ spilling over the pot’s edge. A miniature purple cyclamen (METIS ‘Purple’) and some ornamental kale (‘Glamour Red’) provide that splash of contrasting colour.

Cupressus macrocarpa ‘Wilma Goldcrest’ –This golden Monterey Cypress has intense chartreuse foliage with a strong lemon scent when rubbed. Juvenile specimens are wonderful container plants, much in part to the sharp foliar contrast (it looks good with everything). It is a dwarf cultivar with a dense columnar form. ‘Wilma Goldcrest’ grows 6 to 8′ high by 2′ wide. Zone 7.

Brassica oleracea ‘Glamour Red’ – The first Ornamental Kale to win an AAS Award (in 2011), ‘Glamour Red’ has unusually glossy foliage of ruffled bluish-green that forms loose heads. These develop a bright purplish-pink center when night temperatures fall below 55F. Ornamental Kale is usually planted in autumn and lasts until Christmas. Grows 6-12″ high by 12-15″ wide.

Lysimachia nummularia ‘Goldilocks’ – Golden Creeping Jenny is a hardy perennial and reliably evergreen in coastal BC gardens. The glossy gold foliage of small rounded leaves provides the perfect contrast for Black Mondo Grass, silhouetting each blade. While this is a great container specimen, it can be invasive in ground. Grows 2-4″ high by 24″ wide. Hardy to zone 3.

Cyclamen METIS ‘Purple’ – A miniature cyclamen that can tolerate temperatures close to freezing, meaning that it can be used in fall and winter planters that are sheltered from rain. This variety features a compact growth habit, rich purple back-swept flowers and nicely variegated foliage with silver highlights. Grows 6 to 8″ high and wide. Houseplant or seasonal bedding.

Posted in Gardening | Tagged | Leave a comment

Easy 4-Step Winter Planter

This winter planter is basically a contrast of burgundy and gold foliar tones. A young Nandina ‘Sienna Sunrise’ adds height and a bamboo-like texture, while the glossy burgundy leaves of Leucothoe ‘Scarletta’ are front and center. These are nicely contrasted by Heuchera ‘Electra’ and the arching evergreen foliage of the sedge Carex ‘Evergold’.

Carex oshimensis ‘Evergold’ (syn. Carex hachijoensis) – This RHS Award of Garden Merit winner works well in pond-side plantings or as accents in containers. They form dense clumping mounds of arching green leaves with a contrasting golden-yellow stripe. ‘Evergold’ produces insignificant brown flowers and is reliably evergreen in coastal BC. Grows 8-10″ high by 12-18″. Zone 5.

Leucothoe fontanesiana ‘Scarletta’ (syn. ‘Zeblid’) – Imagine if you could have autumn foliar colour right through the winter – it may sound too good to be true, but this broadleaf evergreen delivers. ‘Scarletta’ has attractive lance-shaped leaves that emerge scarlet-tinted, mature green and then shift to a burgundy-red from fall through winter. Grows 18-24″ high by 3′ wide . Hardy to zone 5.

Heuchera ‘Electra’ – A villosa hybrid with large leaves that emerge an electric yellow with sharply contrasting red veining. These shift to chartreuse as the season progresses, with the winter foliage being a tan colour. Small white flowers are borne midsummer but it is the bright foliage that adds much needed contrast to container plantings. Grows 8-12″ high by 12-14″.

Nandina ‘Sienna Sunrise’ (syn. ‘Monfar’) – This medium-sized cultivar has a narrow upright growth habit and rarely sets flowers. The fine-textured new growth has fiery red highlights, changing to green in summer and back to a burgundy-red in fall and winter. It is reliably evergreen in coastal BC and works well in containers. Grows 3 to 4′ high by 2′ wide. Hardy to zone 6.

Posted in Gardening | Tagged | Leave a comment

Easy 4-Step Autumn Planter

This easy 4-step Autumn planter doesn’t have your traditional yellow, brown and orange fall colours – which means that it won’t look out of place by your front door long after Thanksgiving. The ‘Wilma’s Gold’ Rosemary and Wintergreen will trail over the edge,  while the Tricolor Heather will keep its colour right up to Christmas – when the Drimy’s seasonal red stems will fit right in.

Drimys lanceolata (syn. Drimys aromatica) – Pepper Tree is an upright evergreen shrub native to southern Australia and Tasmania. The bright red stems accent the glossy dark green lance-shaped leaves. Small fragrant clusters of creamy-white flowers appear from mid to late spring. Juvenile specimens work well in planters. Grows 12′ high by 8′ wide. Hardy to zone 8.

Rosmarinus officinalis ‘Wilma’s Gold’ – What makes this Rosemary cultivar different from the rest is its bright gold foliage that trails or cascades. It bears light blue flowers from mid to late spring and is a sport of Rosmarinus ‘Capri’ that was discovered in Holland. ‘Wilma’s Gold’ is a good addition to mixed containers or even hanging baskets. Grows 1′ high by 4′ wide. Hardy to zone 7.

Calluna vulgaris ‘Bud Bloomer Mix’ – The Bud Bloomers are a fairly recent class of Scotch Heather whose flower buds do not open, so while they bloom in August and September, the flower colour can actually last until January. This mix is a combination of a white and magenta Calluna, with the non-flowering gold-leaved ‘Zeta’ added for contrast. Averages 12″ high by 16″ wide. Zone 6.

Gaultheria procumbens – Wintergreen is an evergreen shrublet which has white urn-shaped summer flowers (reminiscent of heather) followed by large bubblegum-scented red berries that often persist through winter. The glossy dark green foliage also takes on burgundy tones in the colder weather, making it a great container feature. Grows 6″ high by 3′ wide. Hardy to zone 3.

Posted in Gardening | Tagged | Leave a comment

Raspberry Rust

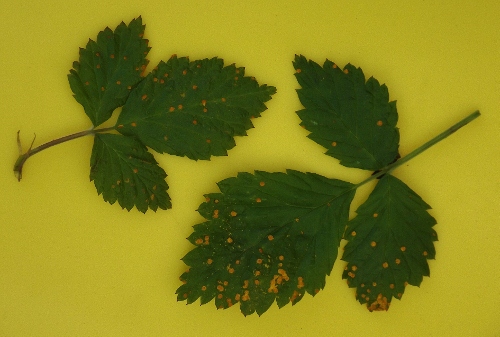
Pest and Life Cycle – (Phragmidium rubi-idaei) Raspberry Rust appears as yellow pustules on the upper surface of the leaf from spring to early summer. By midsummer small orange pustules appear on the leaf underside, eventually giving way to black rust spots in autumn that overwinter. New foliage is infected by spores from leaf litter and old cane stubs, with this fungal disease being more pronounced during prolonged wet springs.

Symptoms – The symptoms vary with the season, with yellow spotting on the upper leaf surface in May and June, yellow to orange pustules on the bottom side of the leaf  in midsummer, with these darkening to black by late summer to autumn. This fungal disease rarely affects yield on otherwise healthy plants, but it can also cause premature leaf drop and reduced vigor.

Management – Monitor your raspberries from spring to early summer. Prune out and discard (do not compost) any foliage showing signs of infection – however, do not entirely strip the cane of leaves.

Prevention – 1. Plant rust resistant raspberry cultivars such as ‘Boyne’, ‘Nova’ and ‘Caroline’. 2. Ensure good air circulation around raspberries by thinning the canes properly. 3. Cut out old canes to the ground as soon as cropping has finished. 4. Remove and discard fallen leaves (do not compost). 5. Replace older plantings every 5-7 years to ensure good vigor. 6. Use a delayed dormant spray of lime-sulfur at bud swell to help control this fungus or a fixed copper (at label rate) when new laterals are leafing out in spring. 7. Lightly fertilize in early spring to ensure good plant vigor. 8. Water in the morning and try to keep the foliage as dry as possible.

Posted in Gardening | Tagged | Leave a comment

Columbine Leafminer


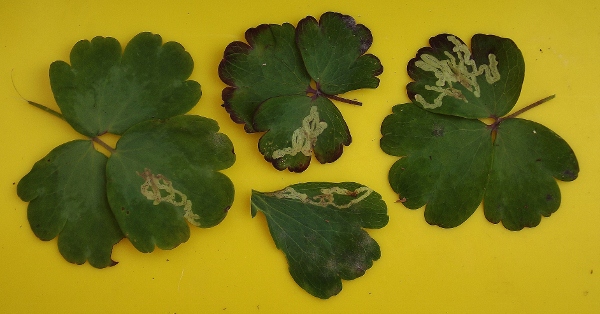
Pest and Life Cycle – (Phytomyza spp.) The Columbine Leafminer adults are tiny black flies that begin to lay eggs on the foliage (primarily Aquilegia vulgaris) in spring. The eggs hatch and the larvae burrow into the leaf, feeding between the upper and lower surfaces. Once they finish feeding, they emerge, attach themselves to the plant and pupate for about 2 weeks, emerging as adult flies. The last generation (there can be up to 3 generations per year) drops to the soil, burrows in and overwinters as pupae.

Symptoms – The symptoms show as whitish to pale tan serpentine tunnels (Phytomyza aquilegivora) or blotch mines (Phytomyza aquilegiana, native to the Southeast United States) in the leaves that contrast sharply against the adjacent deep green tissue.

Management – No chemical control is necessary as this pest seldom does permanent harm to the plant. Simply remove the affected leaves as soon as the damage is visible and discard in the garbage (do not compost) – this will break the pest’s life cycle.

Prevention – 1. Cut down all parts of the plant in fall (once the foliage has completely yellowed) and discard in the garbage (do not compost). 2. Lightly cultivate the soil around established plants in late fall to expose and destroy any overwintering pupae. 3. Plant resistant species and cultivars such as Aquilegia canadensis (your best choice), Aquilegia flabellata and Aquilegia caerulea ‘Dwarf Fantasy Mix’.

Posted in Gardening | Tagged | Leave a comment